Accent Walls: Annoying or Amazing?

petoskeyplastics DIY Advice, Painting, Remodel

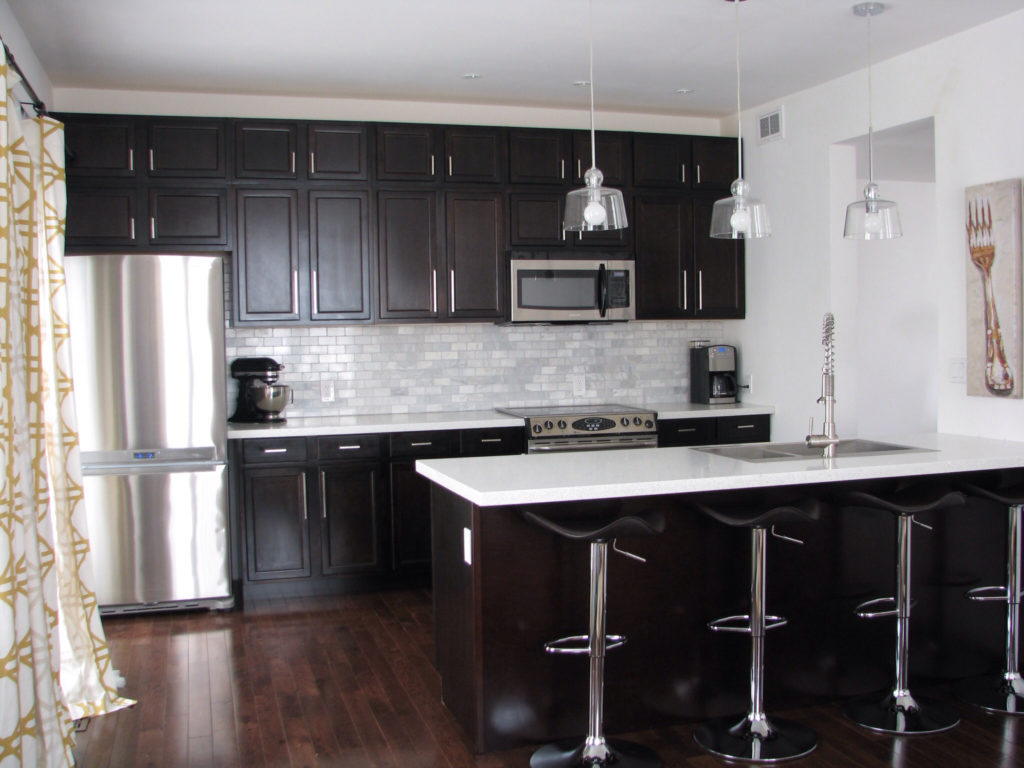
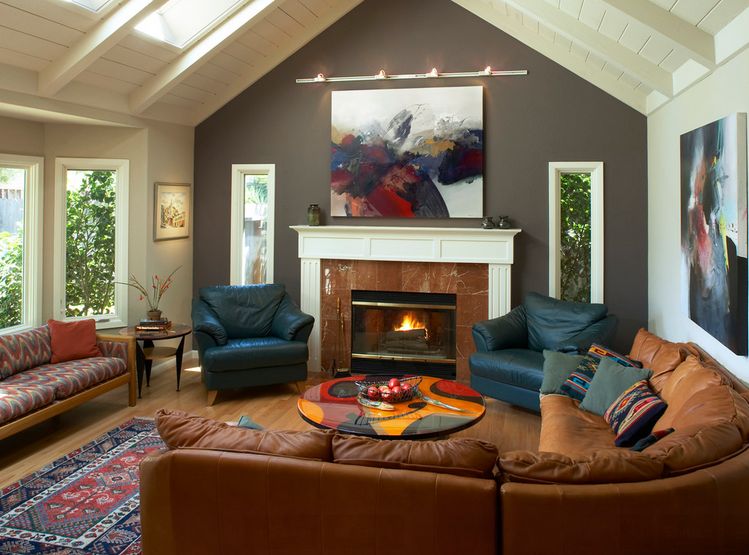
Accent walls have been a prevalent focal point of home design for the last few years. Some designers adore the idea while others aren’t sold. Where do you stand on this topic? Personally, I’m a fan. Accent walls are great opportunities to add an extra fingerprint of your own sense of style. Could it go too far? Absolutely! However, that’s why it’s important to take a few things into account before moving forward.

The first item to consider is what is going to be on your accent wall. As soon as you add a brilliant color, the focus will shift to it. Before deciding which wall, you will definitely want to have something of interest to fill it. The options are endless. If the accent is in your main family space, photos and maybe your television could be an option. Any sort of art would be a great option as well.

Another thing you’ll want to make sure of is that the colors don’t clash. Everyone knows that when you get two similar shades of the same color next to each other it can look bad. If you’re going for the accent wall, go big or don’t go at all. Luckily color swatches and other items exist to help prevent this issue, but don’t be afraid to take a small step outside your comfort zone.

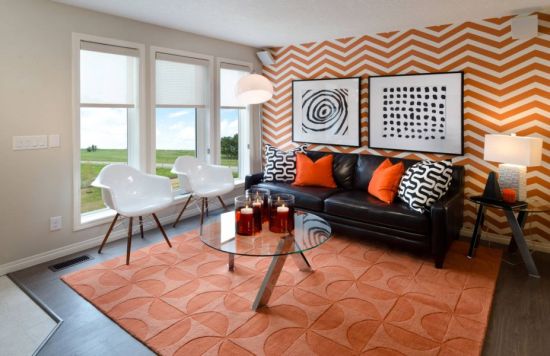
Last thing: don’t be afraid to explore patterns. Sometimes a wallpaper or painted pattern can bring enough attention to the wall to break it up without the extreme measure of an entire wall. I did just say to make sure to be bold and this is doing so but in a different way. Although the colors might be a bit more muted, the pattern opportunities available can help provide an ambiance that one solid color would not.

No matter what wall or room you paint, you need to prepare for the mess that will follow. Steelcoat® carries products that will meet any need you may have during a painting project. Head on over to our website steelcoatproducts.com to see our entire line!


Selecting the Right Subway Tile

petoskeyplastics DIY Advice, Remodel


Although it isn’t the focal point that granite countertops or stainless steel appliances may be, subway tile placed in the correct manner can upgrade the atmosphere of a room. One thing is for sure though, nothing could have prepared me for how many options there are when selecting how to outfit a backsplash.

Color:

There are many options when it comes to tones of the tile being placed in your home. From the classic white to metallic hues, the spectrum is endless. One facet that must be taken into account though is the grout. What type of accent would you like to achieve? For example, if you choose to have a simple look with white tile in a straight pattern, do you want the tile to blend into the background with a white grout attaining a clean design or would you rather achieve a level of contrast with a dark grey? Each has its own unique flavor.

Size and Shape:

This aspect could determine a lot about your layout. Subway tiles come in more shapes and sizes than you can imagine: squares, rectangles, octagons, hexagons. They’re all available if you desire them!

Pattern:

Your choice for size and shape will help determine your pattern. I was absolutely blown away with the patterns that can be used when creating the backdrop for a room. Check out this picture from bloglovin.com that shows 9 of the most popular patterns.

The last thing I wanted to touch on has less to do with the tiles themselves and more with the overall layout of your kitchen. If you decide to use subway tile, do me one favor. Think about the tile would look taking up the area between your counter top and cabinets, which is the more familiar layout and then also think about what it would look like if it extended all the way to your ceiling. Depending on the patterns and colors chosen, this may cause the room to get a bit busy. However, trying something like this could create an incredible aesthetic completely different from what was originally planned.

Once you’ve made the decision to makeover your backsplash make sure you’re prepared for the demo process. If you’re removing previously placed tile or another substance designate a location to place that discarded material. When adding the new tile, you’ll also need to protect any areas in danger of a possible grout mess. Steelcoat® offers both contractor bags and plastic sheeting for these types of situations. Check out our product flyer page for more information on these products!

Great Ways to Increase your Home’s ROI

petoskeyplastics DIY Advice, Remodel

It’s safe to say that remodeling parts of a home has been a steady trend in the real estate sector. Since the renaissance of the DIYer, revamping a room and upgrading houses to get more bang for your buck has been a rather large part of the industry. Based off of media opinion, the hot spots for performing these makeovers seem to focus on the kitchen and bathroom. Nothing grabs the attention at an open house like a subway tile back splash or brand new dual vanity. However, what would you say if I told you that there were other updates that may actually bring you a larger amount of ROI? Remodeling magazine actually takes a look at some of these figures in their 2016 Cost vs. Value Report. Follow the link to see the entire report, or check out my highlights below.

Did you know that the most valuable item in your home that can be upgraded is in your attic? I’ll give you a chance to guess what it could be. It’s actually insulation. According to the cost and value report the cost recovered from performing a task for this nationwide would be 116.9% on average nationwide.

Following insulation is stone veneer which averages a 92.9% ROI. Coming in third is a mid-sized garage door replacement with a 91.9% return. Rounding out the top five are the addition of a steel entry door and an upscale garage door replacement at 91.5% and 91.1% respectively.

As you can see from this list, cosmetic upgrades are important, however that seems to apply more to the idea of curb appeal than the inside of a home.

Whether you’re a professional in this industry or not, remodel projects always yield some sort of mess. Make sure to check out the Steelcoat® line of products before you jump into to any home improvement endeavor to help keep your workspace clean and protected!

Clearing Up Confusion About Caulk

petoskeyplastics DIY Advice

Caulking is an underappreciated aspect of the home improvement process. Without it you could end up with a drafty home and skyrocketing energy bills, or mold issues because of a leaky seal in the bathroom. Let’s take some time today to talk about caulk and how much of a role it can play in your next DIY project.

Caulk is a very versatile substance. It can be great for painting applications or seals around windows. You can use it as a waterproof barrier around your sinks, toilets and showers. However, you need to make sure that you do your research and select the right type before getting started. Caulk falls into two main categories: acrylic and silicone. Acrylic is best used for sealing and filling dryer areas, is a bit easier to apply and cleans up well. Silicone on the other hand, is the right choice for outdoor use or any area that could be exposed to moisture. Silicone is not recommended when painting as paint will not bind to it.

From there you’ll want to make sure you’re equipped with a caulk gun and equipment for tooling. Luckily, the best things to use for tooling are your fingers! If the area has been caulked on a prior occasion, you must remove what is currently there. You can do this with a caulk removing agent and tool both found at your local hardware store. Apply alcohol to the surface once old caulk is removed for cleaning purposes and wait to dry before adding new product.

Finally apply a consistent bead of caulk (but don’t overdo it) and use your finger to smooth out the surface. To be safe wait 24 hours for drying. If you’re applying the caulk outside try and find an open window of time with good weather.

As with anything in the home improvement department, messes can be difficult to avoid. Nothing is worse than an accident that puts a dent in the budget. Make sure that when you get ready to caulk, you take the proper precautions and cover up any areas that could be a danger zone. The next time you have a new project, live on the side of safety and lay out some Steelcoat® Plastic Sheeting. It’s great for floor and furniture protection and will make the cleanup process nice and easy!


The Steelcoat® Spring Cleaning Checklist

petoskeyplastics DIY Advice, Seasonal

Guess what? Winter is finally coming to end. Birds are chirping, lawns are no longer white, and every once in a while we can head into work without a bulky jacket on. With spring comes a new beginning for many, including you! Let’s get to work on a fresh start; we can start with some major decluttering. We get it, it’s been a very long and gloomy winter, but nothing will make you feel better than coming home to a clean household after a weekend full of elbow grease.

Luckily for you, we’ve got something right here to help you take the first and most difficult step! It’s the Steelcoat® edition of your spring cleaning checklist.


Inside:

  1. Cleaning your floors: This is a great time to do a deep clean. It doesn’t matter if it’s carpet or hardwood, tile or vinyl; all of them need some love. It might be smart to bring in a service to help you out if this is a big job.
  2. Rearranging the furniture: You can kill two birds with one stone here. Give your home a fresh look for the upcoming season and while you’re doing so, take the time to clean underneath where all of these items used to sit.
  3. Dust every little thing: This is no exaggeration people. It’s amazing how many dust bunnies accumulate in a few short months. Leave no stone unturned!
  4. Vacuum the furniture: I don’t mean just lifting up the cushions to locate the small fortune that has been accumulating down under. Use your attachments and get all that dust and grime off those armrests and cushions.
  5. Empty the fridge: Who knows what could be lurking in the back corner of your bottom drawer. This is the perfect time to remove all the food and shelving in order to scrub out any questionable remnants.
  6. Scrub out your sinks: Hot water and soap is a great recipe for all of this.
  7. Clean out the grout on your stove top: Depending on the type you have, some research may want to be done on cleaning technique, but while you’re here, a toothbrush works great for gas, and you can find cleaning solution for ceramic at any grocery store. Also, while you’re working on that, you might as well run a self-cleaning cycle in the oven.
  8. Give the dishwasher a run without any dishes: Yes even your cleaning devices need to be cleaned out once in a while. Do this and add a cup of vinegar for best results.
  9. The ever menacing closet: Just take a deep breath, it’s going to be ok, you can do this! And when you’re finished you won’t believe how fantastic the results will make you feel. 

Outside

  1. Wash out your trash cans: Everyone knows that the contents of a garbage bag can get a bit disgusting. Over a period of time, spills and leaks can leave behind unwelcome residue, so make sure to do your best to cleanse your containers.
  2. Sweep out the garage floor: Dirty snow is a big culprit for causing this to be on the list. Snow sticks to the car, car goes in the garage, and snow melts. It ends up on the floor where the dirt stays, building up a messy mixture.
  3. Keep that broom out: Use it on your deck and porch for a quick way to straighten things up.
  4. Wipe down the outdoor furniture: Whether they’ve been kept in storage or not. A rag and some warm soapy water should restore its sheen.
  5. Mow the lawn on a high cut setting: This isn’t as much cleaning as it is setting up your lawn for a successful spring and summer of growing.

So that’s our Steelcoat Spring Cleaning Checklist!

Feel free to print it off and use it yourself, or add any other items we missed in the comments. Let us know if there are any topics you’d like to cover in the future-we love suggestions!

Dreaming of Spring Cleaning? Steelcoat Contractor Bags Can Help.

petoskeyplastics Uncategorized

Ok, so maybe you aren’t actually dreaming about the idea of cleaning out your basement, but instead the smell in the air on those first few days with tolerable temperatures or the initial warm breeze that doesn’t cause an uncontrollable shiver throughout your body. Spring is a wonderful time of the year, flowers bloom, snow melts away, and somehow it makes us feel like the world is starting anew and we need to declutter.
In case you were wondering, the phrase spring cleaning came from a time when homes were heated with coal, causing grime and dirt to build up while everyone stayed inside and tried to stay warm during the winter months. When spring arrived, families could finally return to the outside and would scrub down any part of the home they could reach.
Now we go about this season’s cleansing a bit differently. Although productivity is possible during the winter months, projects around the house go from a cold and bitter chore to an opportunity to be active. If you’re finally coming around to the idea of disposing of those grimy clothes your significant other can’t seem to part with, or clearing out that garage that’s beginning to look like a hoarder’s paradise, we’ve got exactly what you need in our inventory.
Steelcoat bags range from 13 gallon drawstring that can help you tidy up around the home to our heavy duty contractor bags that have the strength to hold up against any pile of rubbish that’s been hiding away and hoping to survive another season. Whatever end of the spectrum you’re on, we’ve got you covered there and anywhere in between. If you’d like, you can even check out the rest of our product flyers if you click on this link. So don’t fight that fresh spring feeling, instead embrace it with Steelcoat drawstring and contractor bags and finally rid your home of all that unwanted clutter.

Steelcoat® Tips for Painting in Cold Weather

petoskeyplastics Painting

There is never enough time to check off everything on your to-do list. Tasks get pushed back a day, a week, and before you know it maybe even a month has passed before you’re able to remodel the den, or give the shed in the backyard a new coat. In the past certain tasks have had an issue of being limited by seasonality. Especially if you live in the Midwest, Northeast, or any other part of the country that experiences four full seasons. Spring is for cleaning out the house, summer is for perfecting your curb appeal and fall has you hustling to keep all of the previous work from being covered up by falling foliage. Winter is a completely different ballgame though. Once that cold hits, many are limited to shoveling and plowing. But what about those tasks that slipped by your summer checklist, into fall and were never addressed? If any of those happen to include to adding a new coat of paint to an existing structure in your yard, you may be in luck.

Within the last decade the outdoor painting game has brought itself up to another level. 50 degrees Fahrenheit has been a line not to be crossed by painters as any environment below that temperature would cause nothing but problems for painters. That’s not the case any longer. The range reaches as low as 35 degrees depending on what type of paint selected.

If you must paint in these conditions make sure to take the following safeguards. First, as already mentioned you’ll want to verify that that the temperature range of the product matches the conditions outside. Then you’ll also want to take the temperature of the surface you’ll be painting as it may not match that of the air. This can be accomplished by using an infrared non-contact thermometer. You can find these at your local hardware stores or on amazon. If you can help it, try to paint during the hours of the day with the most sunlight. While this is advised against during the summer, “following the sun” as some refer to it as can increase temperature by a degree or two and help the paint bond more easily to the substrate. Finally, make sure that your brushes are capable of handling the possible difference in consistency of the paint colder temperatures may cause.

If discretion is not taken, it will open up a plethora of issues. Cracking, poor touch up quality and color consistency can all become problematic without the proper care. On top of these, low temperatures can also cause latex paints to freeze, and cause oil based paints to turn more syrupy. Overall drying time will increase as well.

Steelcoat® High Density Masks, Covers, and Protects

petoskeyplastics DIY Advice, Painting

If you’re already a participant in the paint industry, you know how important plastic sheeting can be on a frequent basis. There is an abundance of ways that it can come in handy on the job site but those who aren’t around the paint industry may not have as clear of an understanding as to its benefits. DIYers may not see the potential within those thin pieces of plastic, so let’s take a few minutes to explain why exactly plastic sheeting, painter’s plastic, and masking film can be beneficial to any at risk workspace.
These products perform three main tasks: they mask, cover and protect. In our first example we’ll discuss the masking aspect. A worrisome aspect of undertaking any paint job is the splatter, if you aren’t careful paint can get in every little crevice. With a product like Steelcoat® High Density Painter’s Plastic you’ll have the ability to cover any area of need and have confidence that the superior tape adhesion built into our non-slip film will keep your floors and furniture clean.

High Density Poly Film is highly applicable for any sort of coverage indoors or outside. In this situation it can apply to a large field of users ranging from retail consumers to industrial professionals. You could be working on a project in your backyard and a storm hits suddenly. If you don’t have enough time to move all of the equipment under cover this film can act as a temporary barrier between your equipment and the elements. On the industrial end of the spectrum, the wide range of sizes available from Steelcoat® allows for coverage of your product no matter the shape so that it doesn’t collect dust or dirt while waiting to be shipped off to a customer.

Finally, High Density Painter’s Plastic is great for protection purposes. With its built-in cling treatment, Steelcoat’s film can help you keep your drywall and furniture free and clear of any possible debris that may come loose when doing any work on your ceiling. It can also be set up as a vapor barrier to protect workers on the job site that may not be equipped with the proper safety equipment.

Cracking the Vault on Private Label

petoskeyplastics Private Label

This week we’re changing up the pace to discuss a service that Petoskey Plastics is proud of being able to provide through the Steelcoat® brand. Private label is an underrated piece of our business and sometimes doesn’t get the credit it deserves. Much of the reason for that is because the process is exactly what it sounds like; it’s highly classified information. Why is that? Well the idea behind private label goes somewhat like this: a company wants to add an item to their branded product line, however they may not have the equipment to do so themselves, so they look for someone who can help them achieve their goal.

Let’s use an example to elaborate. We’ll say that a national outdoor company named after a region of the Andes Mountains has decided they want to expand their winter line to now offer skis and snowboards along with the clothing items they provide. Since they already boast all of the apparel for these activities, these two items would basically allow them to complete their offering. Instead of going out and purchasing all of the equipment necessary to manufacture the product, they outsource it to a company that specializes in this field and can start production in a short period of time while also keeping branding consistent. As long as the equipment lives up to quality standard (which private label manufacturers such as Petoskey Plastics specialize and take pride in), the consumer won’t be able to tell the difference.

Through the Steelcoat® brand, Petoskey Plastics is able to do this with any of our products. And we already do, supplying six retail trash bag and seven plastic sheeting private labels to various customers. Interested in high density painter’s plastic? We have got you covered and can even add our Grip-N-Guard® technology to enhance your product. What about heavy duty contractor bags? We can do that too. Feel free to check out all of our product flyers. Anything listed there is within the realm of possibility.

If you have questions about this process, make sure to leave a comment below or visit the Contact Us page on our website. Petoskey Plastics would be happy to answer your private label questions!

Bursting Paint Bubbles: How to eliminate these setbacks once and for all.

petoskeyplastics DIY Advice, Painting

Bubbles. Where does your mind go when you think of these shiny spheres of soap? I bet a lot of your memories take you back to being a child, running around the lawn in the summer, and trying to catch them before they touch the ground. Paint bubbles, on the other hand, bring none of those happy thoughts to the forefront of your mind. In fact they probably uncover feelings that are the polar opposite; annoyance, frustration, aggravation to name a few. The occurrence of a bubble, or blister as some in the painting world have named them, are dastardly obstacles that can take a perfectly fine paint job and change it from a weekend DIY project to a much more labor intensive endeavor. So let’s take a look at what causes these things to happen, how to fix them, and how we can properly prevent it from happening in the first place.

How do paint bubbles form? Why do they happen? In reality, there is more than one answer to this question, one of which is as simple as the weather. This will in the vast majority of occurrences happen outdoors. Keeping it simple, don’t paint within hours of a storm because the moisture present in the air during this time as well as the rain itself can do its damage. It doesn’t matter if you want to paint before or after, just don’t. In one situation your surface could contain moisture before you begin painting and in the other, moisture could penetrate the surface before the paint is completely cured. Bubbles can also be caused by failing to properly prep your surface. Any type of dirt, grease (kitchens), or moisture on a surface can be the perfect formula for paint separation. Make sure that the designated area has been cleaned, is dry, and has been primed before application takes place.

But once paint bubbles form-and they will- what’s next? How are they fixed? There are a few videos out there that show using an iron on your wall for a quick fix, but it all honesty, the best thing to do is to scrape off the affected area and start over. Make sure the surface is smooth to a point where you can feel a difference between the painted and bare surfaces and also that any pits are filled in. Then prime and paint just as you had before. As long as you have prepped the area in the correct fashion, you should be good to go!

Prevention has been discussed above, but just to reiterate… prep, prep, and then prep some more. The best way to prevent bubbles from forming is to make sure that there is no dirt, dust, grime, grease, water, or whatever other substance you can think of present in the area you would like to paint.

Lastly, don’t forget to shield the area around which you’re applying the paint. There’s nothing worse than a job well done, only to find out some splatter ended up on your favorite chair, or that you’ve created more work for yourself because your brush accidentally dripped on the floor. One of the best ways to accomplish this is with Steelcoat High Density Painter’s Plastic, which will cling to any surface you need to protect with its Grip-N-Guard technology.